Toenail Polish
how its done

Did you ever wonder how some of your girlfriends have outstandingly nice toenail polish?
Which salon did they use to get their nails so nice?
Or how did they manage to get the polish onto their toenails so beautifully without a Nail Technician or Pedicurist doing it for them?
It is simply attention to detail and following the steps listed below.
It is a case of practice makes perfect though, then you too can get that lovely deep luscious shine and have done it all on your own with your very own.
home pedicure.
Men using nail varnish
It is interesting and great to see a new trend towards men using nail paint too.
Some male celebrities including some stars of sports like Christiano Ronaldo of Real Madrid are now seen sporting their own toenail art, and very nice it looks too.
When you think about it, hot countries where open toed sandals or open shoes/sandals are worn as normal offer a much healthier environment for the feet, so why not decorate the toenails.
It adds color and brings the whole body into view.
It is a personal statement of fashion and adds color not only to the nails but to the character of the wearer.
Go ahead, be colorful, enjoy the attention and admiring looks.
Before starting take a look at the page on
Application of Toenail Varnish.
To apply the nail polish to toenails on your own is an art in itself.
Getting it right gives amazing results, getting it wrong and you may as well feel like staying in for the evening.
Toenail Art
Getting that finished, deep luster takes some serious concentration.
If you are showing them off in a nice pair of sexy sling backs, open sandals or peep toe wedges, then your toenails just have to look their very best too.
For this we need to have a set of proper pedicure tools, clean and sterilized of course.
Toenail varnish is really nice to wear and show off but in doing this we need our feet and toenails to be in top condition.
So why not make it a full “foot-pampering” package and give yourself a nice relaxing
foot soak
too.
Check out our pages on :
Healthy Toenails
Acrylic Toenails
Toenail Designs
Toenail Art
Pedicure kit
Listed below are the tools and nail polish equipment you will need to get those toenails looking beautiful.
- Nail cutters.
- Cuticle pusher.
- Cuticle clipper.
- Nail file.
- Pumice stone.
- Cotton balls.
- Nail polish.
- Base coat.
- Top coat.
- Polish remover.
- Orange wood stick.
- Antibacterial soap.
- Cleaning Alcohol.
- Towel.
Keep it all together tidy and clean with everything in a case or bag and a little spray of
tea tree oil
Toenail Polish
the D.I.Y. guide

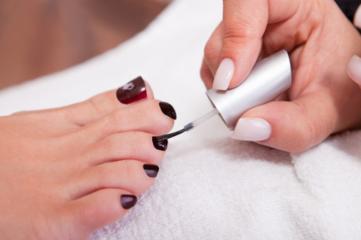
1. Clean and wash your feet thoroughly with running water using a mildly antiseptic soap. Pat dry around under and between the toes.
2. Examine your toenails. Do they need cutting? Do they need cleaning? Do they need shaping or filing?
3. With clean, shaped, and dry toenails we move to the first step which is the Base coat application.
This can help in protecting your nails from nail polish chemicals.
The toenail polish will also last longer with base coat applied.
4. Shake the bottle of polish to avoid clumping and to keep the polish nice and thin.
It is very important that you put on a thin layer.
Remove any excess polish from the brush before applying by gently tapping it on the inside lip of the bottle.
Top Tip on applying the polish: center, left and right. Just three strokes, from the nail bed to the nail tip.
If you feel that the polish is spread too thin and lacks color, then add one more coat of the polish.
5. Scrape off leftover polish using the orange wood stick. Put on top coat and let it dry.

Toenail polish application is not hard – not at all.
Check out the photo of mum having her nails painted, great toenail art from a toddler.
You can do it at home! Or better still, call a friend, and do each others toenails.
That will be a fun thing to do!
Next stop, toenail art and designs.........
Back to Top of page
Skip from Toenail Polish to Toenail Art
Jump back to Toenail Care home page


